Dynamic text styling adds a new dimension to text presentation in Flutter applications. By leveraging the RichText widget and conditional styling techniques, developers can create visually engaging and informative text content that adapts to various contexts. Incorporate dynamic text styling into your Flutter projects to enhance user experience and convey information effectively.
Introduction
In mobile app development, displaying text content is a fundamental requirement. However, static text styling may not always suffice, especially when you want to add visual interest or convey additional information through text formatting. Dynamic text styling addresses this need by enabling developers to apply styles dynamically based on various factors.
Understanding Dynamic Text Styling
Dynamic text styling involves altering the appearance of text elements in real-time based on conditions or data. This could include changing font sizes, font weights, colors, or even applying different text decorations. In Flutter, the RichText widget offers robust capabilities for implementing dynamic text styling.
Implementing Dynamic Text Styling in Flutter
To implement dynamic text styling in Flutter, follow these steps:
- Split the Text: Start by splitting the text into individual words or segments. This allows you to apply different styles to each part of the text.
- Define Text Spans: Create TextSpan objects for each word or segment of the text. Within each TextSpan, define the desired text style properties such as fontSize, fontWeight, and color.
- Apply Conditional Styling: Use conditional statements to determine the styling for each text segment. You can base these conditions on any criteria, such as the position of the word in the text or specific data values.
- Assemble RichText: Finally, assemble the TextSpan objects into a RichText widget, which can then be displayed within your Flutter application.
Example Code
RichText buildDynamicText(String text) {
List<String> words = text.split(' ');
List<InlineSpan> spans = [];
for (int i = 0; i < words.length; i++) {
spans.add(
TextSpan(
text: words[i],
style: TextStyle(
fontSize: 25,
fontWeight: FontWeight.bold,
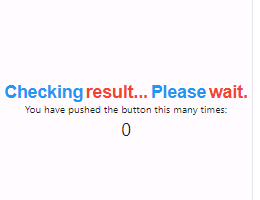
color: i % 2 == 0 ? Colors.blue : Colors.red, // Change colors dynamically
),
),
);
if (i < words.length - 1) {
spans.add(const TextSpan(text: ' ')); // Add space between words
}
}
return RichText(
text: TextSpan(children: spans),
);
}
Conclusion
Dynamic text styling adds a new dimension to text presentation in Flutter applications. By leveraging the RichText widget and conditional styling techniques, developers can create visually engaging and informative text content that adapts to various contexts. Incorporate dynamic text styling into your Flutter projects to enhance user experience and convey information effectively.
In summary, this blog provided an overview of dynamic text styling in Flutter, along with a step-by-step guide and example code for implementation. Experiment with different styling techniques to tailor text elements to your application's requirements and design aesthetics.